
Hello my dear !
I made my very first “how to” video! 🙂
I hope you like it! It surely could be better, especially the explanation, as my husband told me he doesn’t get how to paint it with my explanations……. 😉 Good test! I also had trouble to find a good viewpoint with the camera and still keep some freedom of movement while painting. So if you see me doing funny moves, that’s why. And finally: I also was quite nervous!
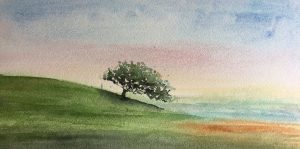
Here is some extra text explanation: first of all: this landscape is not my composition. I copied it from a picture I saw in an art magazine because I loved it so much, BUT I forgot to write down the name of the original artist. Bad point for me! So if you recognize yourself: please write me so I can credit you for this beautiful work.
First step: wet in wet background
I spray clear water on the paper and make a background wash of a mixture of blue (ultramarine, and cerulean blue by Winsor & Newton), pink (Potter’s pink and magenta) and yellow (natural sienna) for the sky, and green (sap green and green earth), brown (burnt sienna) and blue (turquoise and cerulean) for the earth. The warm colors for close by and the cold colors for far away landscape.
To make washes use a big mop brush. I used a japanese goat hair bamboo brush. But any large brush that can hold a lot of paint will do.
Second step: wet on dry for the foreground
For the foreground I don’t wet my whole paper, because I want sharp edges. I make the sky a bit wet to have soft edges and the colors melt into each other, but for the grass hill I want a sharp edge, so the paper has to be dry. Also in the far away landscape I want sharp edges to suggest some hilly scenery.
Never put your horizon in the middle. Put it top third or bottom third of the paper.
I used a large sable brush which has also a fine point for the far away hills
Third step: the details
Now I want the details to bring structure in the painting. After looking at the painting again: I think I should have put the tree more to the left, to make it look more interesting. An object in the middle of a paper tends to be more boring.
A good tip: Make your shadows really dark, with a lot of pigment. The shadows are melting in the grass of the hill under the tree, and also the trunk of the tree is in the shadow, as well as the leaves at the bottom. The dark green is Perylene green by Winsor & Newton. I use it also in the grass. To top leaves are sap green and turquoise with more water to make them lighter.
I paint the details with a small sable brush by Escoda and with a synthetic Escoda brush. Escoda is a Spanish family company that makes very fine brushes. Check them out!
Fourth step: the structure and to know when to stop
The most difficult part: know when to stop so you don’t overdo it ! I could continue to work on it for hours and the suddenly it is ruined: painted to death! AARRRghhh!
So to add some structure and bring the grass to the foreground I add some dry brush strokes and make the bottom darker. I also add some splashes. It gives spontaneity and will lead the eye to the tree. Don’t splash the sky too much green 🙂 To make dry brushstrokes: put paint on your brush with few water and move your brush quickly and lightly over the paper surface.
Was this helpful or do you need to know more? Just mail me or comment below!
Insight without action is worthless so take action: Did you learn something new? Try it out for yourself immediately to implement it 🙂
My way to paint a watercolor landscape
This is so beautiful! I loved that you added a figure in it at the end…that made the painting perfect! Thank you for the writ up on this, the tips and hints and the colors you used. I am so going to paint this! I love it!! Thank you so much for sharing…..I’m looking forward to seeing more on YouTube from you.❤️
So beautiful. When you painted the figure….it was like putting icing on the cake…perfect!! I am so going to try to paint this. The tips and hints along with your painting colors will really help…thank you! I look forward to seeing more videos from you. I love this!!!❤️
Thank you very much, Nell, for your comments!
I was very nervous because it’s my first tutorial video, so it is heart warming to read that it is helpful !
Don’t hesitate to show me your work and to ask further questions if you need some more tips. Maybe there were things I didn’t talk about.
Love and take care,
Barbara